Today we’ve got two great wreath making tutorials by Ra Ra Kitty, a beautiful floral wreath and a funky neon wreath. Have a go yourself and share your success with us by tagging #confettifairDIY on Instagram.
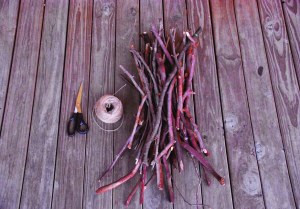
Step One: Collect twigs all roughly the same size and thickness (It’s easier than you think), this will make for your base structure, the length of the twigs will determine the size of your wreath. I collected mine from my local park, I like to call this ‘Community Pruning’.
Step Two: Arrange the twigs in a hexagon shape on a flat surface (a table is preferable) making sure the ends of the sticks are crossing over.
Step Three: Using twine of your choice, begin to tie the twigs together as illustrated. For the hanging support of the wreath tie 6 lengths of twine (I used 1.8 metre halved). In the middle of the 6 sections bringing the ends together and tying a knot, I plaited mine, you can even add beads or a macramé knot or two.
Step Four: Once this is done, lay more sticks on top of each other following the shape ( don’t go too crazy) as you need to tie them again this time tie the twigs together in the middle of the shape. Your wreath is now taking shape, and you should begin to feel confident that it is well supported.
Floral Wreath: For this step, I gathered leaves and gum nuts, and supported my local florist by spending $15 on a bunch of meadow flowers and $20 on a bag of Spanish moss (affectionately named Old Man’s Beard).
Make sure at this stage you are happy with the strength of your wreath as it is best to work on it whilst hanging. Grouping the bunches into appealing bouquet’s I tied the ends together with twine, and attached them to the wreath. I then draped the Spanish moss for an added effect.
Neon Wreath: I bought some builders string from Bunnings. You can choose as many colours as you like but I’ve gone for three.
Cut the builders string to your desired length, I prefer longer pieces.Before attaching the string, I grouped the colours together and tied them as a bunch. You can do whatever takes your fancy!
Go crazy and drape and tie the string around the whole wreath. Enjoy!
Do you have a great DIY tutorial that you’d love to share with our readers? Get in touch today!
Sign up for our newsletter if you’d like party inspiration sent straight to your inbox every fortnight.







2 Comments
Great ideas!
I have tones of DIYs to share☺️
You can submit your details using the link in the post 🙂